sweet

Sugar Dusted Cranberries

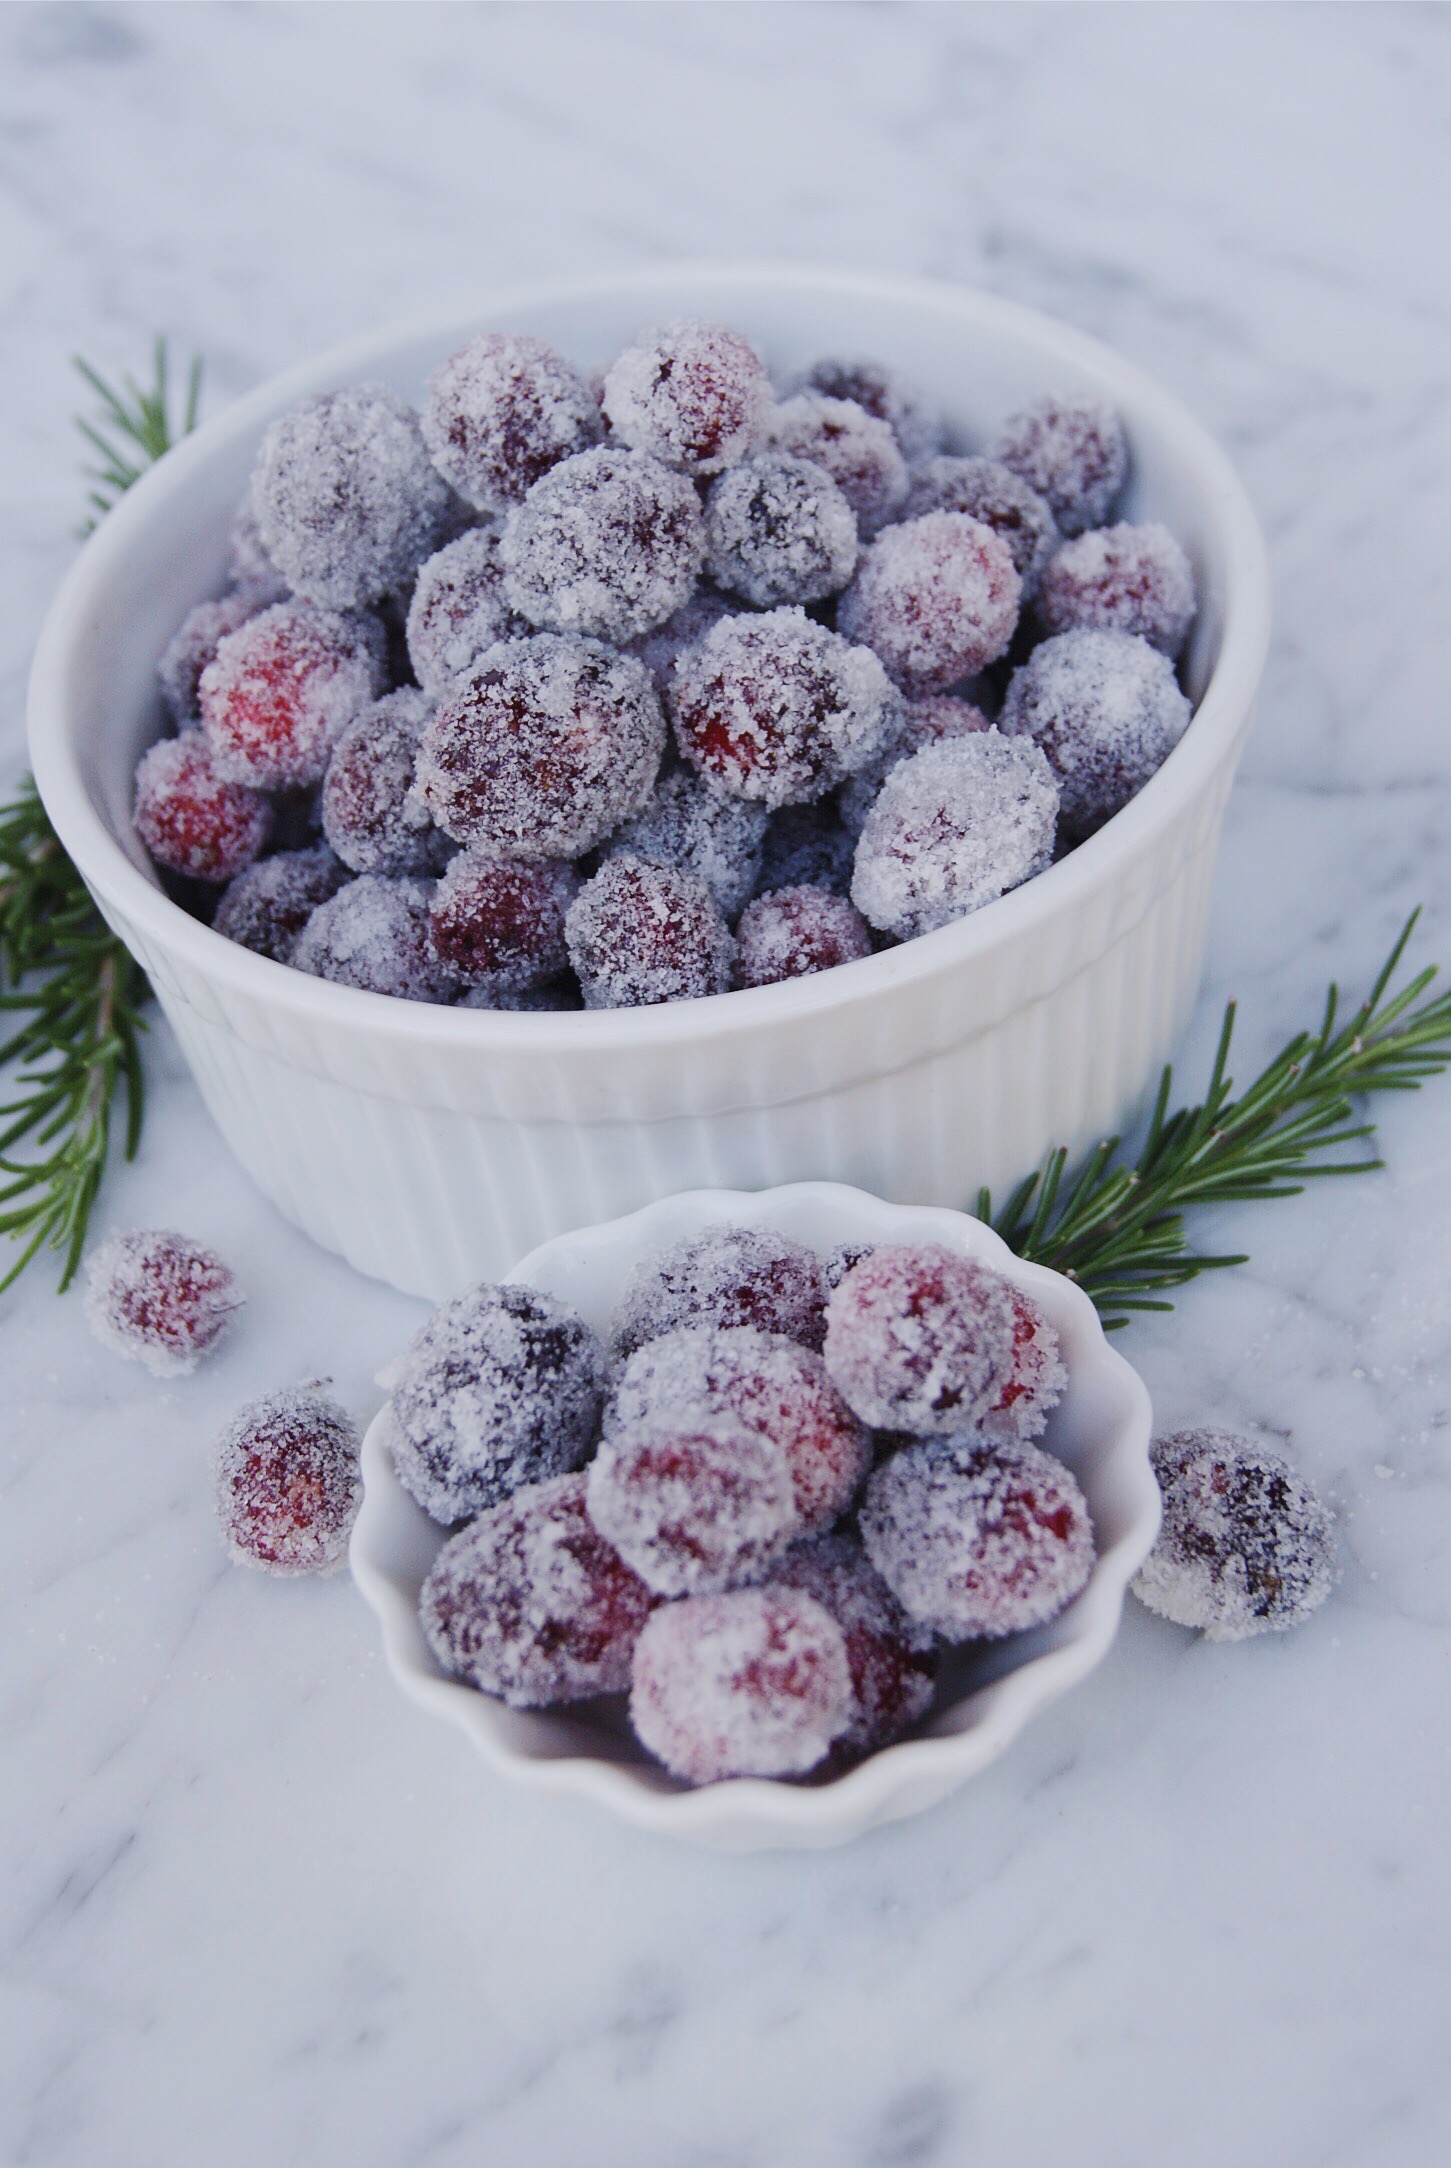
We love gifts, and we love giving gifts to people, so each Holiday season we like to give a little something to everyone we know. Since gifting can get expensive we often make our gifts. This year we are handing out candied nuts, christmas cookies, and these delicious sugar dusted cranberries. These are the perfect gift to give party hosts, coworkers, and friends. This recipe is simple, delicious, and we love how the cranberries look like they have been dusted by snow! We usually wrap them up in a cute jar and hand them out, but they are also perfect for garnish on cocktails (cocktail recipe coming later this week).

xxx Ivy & Eve 

Ingredients:

  • 1 bag of cranberries 12 oz
  • 4 cup granulated sugar (may use less)
  • 1 cup water

Directions:

  1. Combine sugar and water in saucepan. Heat up until the sugar is fully dissolved creating a simple syrup. Remove from heat. Make sure the mixture is not boiling or it can cause cranberries split or pop in the next step.
  2. Transfer simple syrup into large bowl
  3. Pour cranberries into simple syrup, mixing to coat each berry.
  4. Let mixture sit in refrigerator over night (if you are short on time a few hours will work).
  5. Remove mixture from refrigerator. Separate syrup from cranberries (keep the syrup to use for cocktails!).
  6. Pour some sugar into a small bowl and spoon out cranberries onto the sugar.
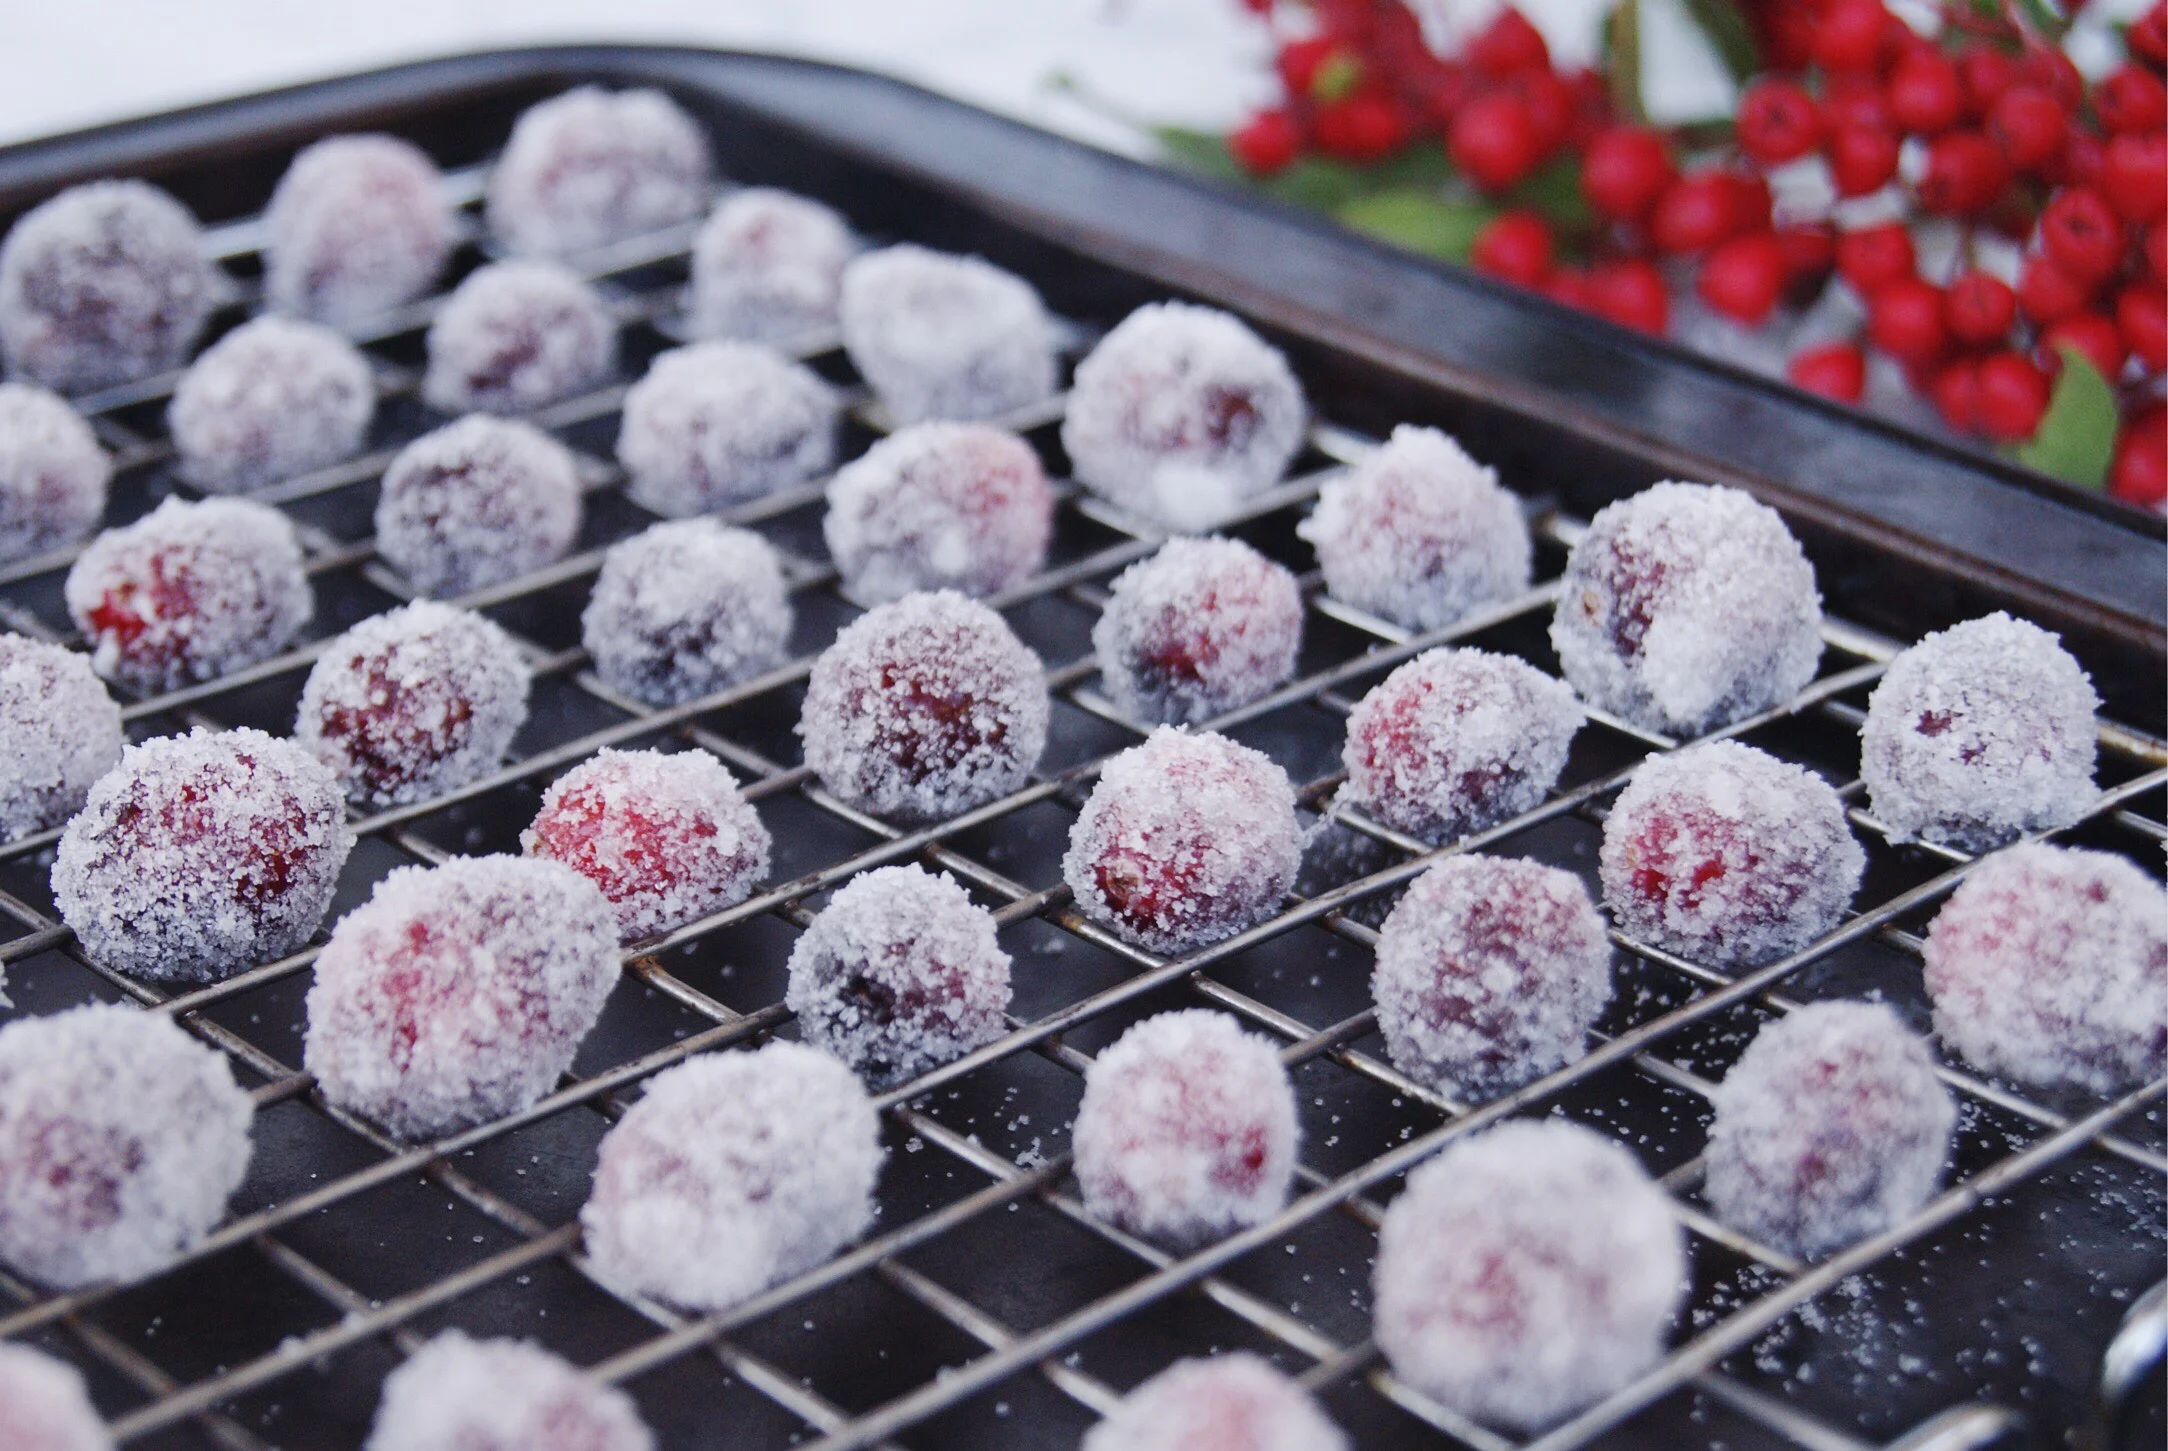
  7. Roll cranberries in sugar till they are fully coated with sugar. Add sugar to bowl as needed.
  8. Set on baking rack to dry. (1-2 hours)

Enjoy!

Magically Delicious Pie

DSC00280.jpg

As children, we spent part of our summer vacations on Lake Erie in Ohio visiting our Grandma C and many aunts uncles and cousins. Those weeks were the highlight of summer, spending the hot and humid days swimming in the lake, walking down the street to buy candy at the corner shop, and convincing the adults to drive us to our favorite drive-in restaurant, White Turkey, AT LEAST once a day. Another perk of being at Grandma's was that she always had sugary sweet cereals and treats in her house during our visits. All the cousins would come down stairs each morning and pour a bowl of their favorite cereal and plan the adventures to be had that day. Our personal favorite was a big bowl of Lucky Charms (We affectionately called them Monkey Germs lol). This pie is a frozen take on our beloved cereal. This recipe transports us back to Grandmas house by the lake. We can almost feel the warm breeze drifting off the lakeshore and hear the distant rumble of a coming thunderstorm. 

xxx Ivy & Eve

Adapted from The Slow Roasted Italian.

Makes one pie with 12 small slices.

Ingredients:

  • 1 box Lucky Charms Cereal

  • 8 tablespoons melted butter

  • One 7 oz. jar of marshmallow fluff (about 1 1/2 cups)

  • 8 oz. cream cheese, softened

  • 2 cups heavy cream

  • 1/4 cup powdered sugar

Directions:

  1. Preheat the oven to 400 degrees. 

  2. Separate the cereal and the marshmallows into two separate bowls.

  3. Melt the butter in a small bowl.

  4. Add 4 cups of the cereal to the bowl of a food processor. Pulse until your mixture is crumbs. Pour in the melted butter and pulse until all the crumbs are moistened.

  5. Pour the crumbs into a 9 inch pie pan and press mixture on the bottom and around the sides to form the pie crust.

  6. Place the crust in the oven and bake for 5-7 minutes until it is slightly golden. Then place the crust in the freezer to cool while you prepare the filling.

  7.  Whip the heavy cream with a mixer until you can starts to thicken and then add powdered sugar. Whip until stiff peaks form. Place the whipped cream in the refrigerator while you make the other mixture.

  8. Beat the cream cheese and marshmallow fluff with an electric mixer until light and fluffy (about 5 minutes). Fold in 1/2 of the whipped cream and a 1/2 cup of the Lucky Charms marshmallows. Pour the mix into the chilled pie crust and smooth with a spatula. Pour remaining whipped cream over top and sprinkle the remaining marshmallows around the edge of the pie. Freeze for at least 3 hours. When it is time to serve, take it out of the freezer and let soften for 10 minutes.

  9. Slice and serve! 

Lavender Vanilla Bean Ice Cream

Lavender is one of our favorite flowers. We love the way it looks, we love how it smells, and we LOVE to eat anything with lavender. As kids, one of our favorite restaurants, Corkscrew Cafe in Carmel Valley, used to serve up the most delicious lavender ice cream for dessert. It was eventually taken off the menu (if you hear us, PLEASE bring it back!), but we never forgot the deliciously floral flavor of this dessert. Lavender is in full bloom in Carmel Valley right now, so we were reminded of our long lost favorite dessert and decided to try to make it ourselves! If we do say so, we think this even more delicious than the original. We added vanilla bean to complement the lavender, and we believe it is just perfect! The ice cream base is adapted from Jeni's Splendid Ice Cream recipe book. Eve went to undergrad in Ohio, where she first tasted flavors like roasted strawberry buttermilk and goat cheese and cherry ice cream. Jeni's ice cream base is unbelievably creamy. You won't be able to eat just one scoop!

xxx Ivy & Eve

We use the Cuisinart Classic Ice Cream Maker for our ice cream adventures. The machine is super easy, and there is no need for ice and salt like the old machines!

Makes one quart of ice cream.

Ingredients 

  • 2 cups whole milk

  • 1 tbsp plus 1 tsp cornstarch

  • 3 tbsp cream cheese, softened

  • 1/8 tsp fine sea salt

  • 1 1/4 cups heavy cream

  • 2/3 cup sugar

  • 2 tbsp light corn syrup

  • 1/2 vanilla bean

  • 2 heaping tbsp culinary lavender

Directions

  1. Combine 1 3/4 cup milk (minus 2 tbsp), 2/3 cup cream, 2 tbsp lavender, and 1/2 vanilla bean sliced open, into a saucepan. Bring to a boil over medium-high heat. remove from heat and let the mixture steep until the desired flavor. (you can steep the lavender in a cheesecloth or strain after this step if you want a smoother texture. We like the lavender left in)

  2. While waiting, mix the remaining 2 tablespoons milk with the cornstarch in a small bowl to make a smooth slurry.

  3. Then whisk the cream cheese and salt into the slurry until smooth.

  4. Fill a large bowl with ice water.

  5. Combine the lavender vanilla bean milk mixture with sugar and corn syrup in a 4-quart saucepan and bring it to a boil again for 4 minutes. Remove from the heat and gradually whisk in the cornstarch/cream cheese slurry. Bring the mixture back to a boil over medium-high heat and cook, stirring with a heatproof spatula, until slightly thickened, about 1 minute. Remove from the heat.

  6. Pour the mixture into a 1-gallon resealable plastic freezer bag and submerge the sealed bag in the ice bath. Let stand, adding more ice as necessary, until cold, about 30 minutes.

  7. Pour the ice cream base into the ice cream machine canister and process according to your ice cream maker's directions.

  8. Pack the ice cream into a storage container. Place the ice cream in the freezer until firm, at least 4 hours.

  9. Bon Appétit!